This Halloween was my wife and I's 15th wedding anniversary so I wanted to do something special. My parents treated us to a Hawaiian cruise and since the four of us would be together where there would very likely be a costume party we decided to do group costumes. After a lot of brainstorming and online searching we settled on Ghostbusters. We bought some fairly inexpensive beige jumpsuits off Amazon along with a pack of Ghostbusters patches. To really sell the costumes I decided to create a couple props, a pair of ecto goggle and a ghost trap.
I started with the ecto-goggles which are just a cheap pair of welding goggles with some spray painted PVC parts glued using liquid nails. I originally used hot glue but it didn't hold very long on the smooth glass front of the welding goggles. Then I added some stickers and weathering to add more realism. The stickers I printed out and the silver paint I used for weathering was from a small paint pen I had gotten to touch up scratches on my wife's car several years ago.
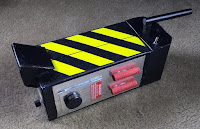
Next I created a ghost trap out of a couple milk cartons. It started with a single milk carton which I spray painted black, then added alternating yellow and black electrical tape on top laid out diagonally. That was a bit of a hassle trying to get the tape angled and cut properly so if I ever create another one I think I'll just print out those stripes on some adhesive paper. I applied some silver duck tape on the sides, then I added a few other things on the sides including a button on the right side which I was going to use to connect the trap to my belt (I had an old cellphone belt clip which the button fit into perfectly) and two red cylindrical tubes on the left side which were old wooden dowels I colored red with a marker. That's all I was going to do originally but then went one step further and made a front piece, a rear piece, and a handle. I designed the rear such that it could open up for adding electronics because I had wanted to add an LED light and an actual toggle switch but I ended up just not having time.
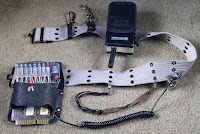
I had found a pair of white volleyball kneepads at Goodwill that looked like they'd work great for the elbow pads, so I got some RIT gray dye and dyed those and a cheap white canvas belt I got off Amazon. After I got the belt, which had small holes in it, I stopped using the cellphone belt clip for attaching the ghost trap and instead came up with using two leather straps linked together and clipped to the belt to make a loop. This held the trap on great and felt better when walking. It didn't come lose once and made it very easy to take the trap off when needed.
Next it was time to create some props for the belt, specifically the walkie talkie and the belt gizmo. The walkie talkie is simply an old pen box spray painted black with a strip of silver duck tape around it, an old wooden dowel for the antenna, and a Motorola sticker. It fits inside an old camera case I found laying so that's how I attached it to the belt. For the belt gizmo I printed out the circuit board onto label paper and applied it to cardboard which I then cut out and folded into the approximate shape. The black coiled cord that attaches from the belt gizmo to the belt is an old cell phone charger. The holster for the belt gizmo was custom made from real leather. I have a friend that has a lot of experience with leather work so I went to his place and he taught me how to do it. While we were there we also made some of the keychain fobs.
In the original film the Ghostbusters all had these transparent yellow pvc tubes attached to their jumpsuits so to make those I bought some clear tubing at Lowe's (they didn't have any which were tinted yellow) along with a PVC union to attach it to the jumpsuit. To make it yellow I followed the advice of someone online who used urinary pain relief pills since I found them on clearance at Kmart.
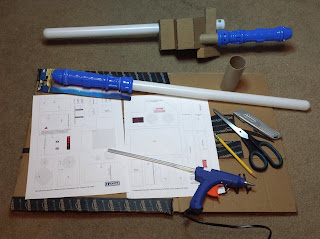
That was going to be it for the costumes until they decided they wanted proton packs as well. For those we found some cheap inflatable ones online. We went with the inflatables because we were going on a cruise and thus had space limitations, but when mine arrived I noticed how crappy the inflatable neutrino wand/proton gun was so I decided to try making one to replace it. I used cardboard for the main body, a generic Dollar Tree lightsaber for the gun barrel and handle, a flashing LED wand from Dollar Tree for the end of the barrel, hair clips (also from Dollar Tree) to attach to the end of the barrel for holding the red wire (which I already had), and then various other knick-nacks added on such as bottle caps for knobs, ballpoint pen clickers for switches, and some old sprinkler parts. Then I figured I should make another so I'm not the only one with a nice neutrino wand. This time I designed it so the body could be opened to add and access some LED lights. One was an LED button I had gotten from the E3 Expo many years ago, the other was from a Dollar Tree bracelet. While my dad and I were going as the original Ghostbusters, my mom and wife were going as the new Ghostbusters so their neutrino wands needed to be designed after the ones in the new movie.
For those I used a milk cartons cut in half for the base box. I used the Dollar Tree lightsabers for the handle and gun barrel base, some leftover pipe foam I had laying around for the grip, and a Dollar Tree flashlight for the part of the gun barrel which has all the holes in it. I drilled out all the holes and slide it over the lightsaber blade, using some thick wire as a spacer to keep it centered around the blade. I then had the idea to cut out the LED in the lightsaber handle and solder it up to a long wire which I could then feed through the lightsaber blade until it was located at the flashlight barrel part, that way pressing the button on the lightsaber handle would make a red glow through the holes of the flashlight. The soldering was a pain but in the end it turned out really well. I used some packing foam to keep the LED centered and in place inside the lightsaber blade. For the paint job I spray painted the box black and then went over it with a light coat of silver to give it the brushed metal look.
I had made way more props than I originally intended but they really helped to make the costumes look much more detailed. Then I learned that before we were to leave on vacation we would be attending a Halloween costume party at her friend's house. It was three days away so I figured I'd try to make an actual proton pack. I picked up some foam board at Dollar Tree to use as the main board, a microwave cover to use as the cycloron, and an LED stick to use as the power cell lights. The rest I built out of cardboard and random stuff I had around the house such as an old medicine bottle, old wires, leftover flexible tubing, popsicle sticks, and more. I used some LED string lights to illuminate the cyclotron lights, and the ALICE frame I found at a military surplus store. I took the straps off, sanded it down, and spray painted it black.
Overall I think the props turned out well. Everyone loved our costumes at both my wife's friend's Halloween party and on the cruise ship. We were constantly getting stopped by people on the ship wanting to take pictures with us which felt pretty good.
The personal blog of Kenneth F. Innes IV... like any of you actually care. How'd you get here anyway? Someone play a prank on you?
Wednesday, November 23, 2016
Tuesday, January 5, 2016
R.I.P, Uncle Bill
This morning a phone call from Mom brought the sad news that my Uncle Bill had just passed. It wasn't unexpected news as he wasn't doing well at all the past couple days and Mom had stayed with him pretty much the whole time. He was always such a happy, fun, and caring guy and will be missed.
Subscribe to:
Comments (Atom)


